
Who doesn’t love a good dessert that brings back childhood memories? Imagine the creamy sweetness of ice cream, the refreshing tang of fruit, and the indulgent crunch of toppings—all transformed into an easy-to-make, no-fuss cake. That’s the magic of a banana split cake! If you’re tired of the same old desserts or just looking to impress your guests, this cake will be your secret weapon.
Introduction to Banana Split Cake
So, what exactly is a banana split cake? Well, it’s a dessert that takes all the flavors and fun of a classic banana split sundae and layers them into a cake. Think of it as the cooler, more sophisticated sibling of the traditional banana split—except it’s served in slices rather than bowls. It’s perfect for parties, family get-togethers, or even a cozy weekend treat.
Looking for more dessert inspiration? Check out Crumbl Cookies: The Weekly Flavor Adventure You’ll Love for unique cookie ideas to pair with your cake.
What Makes Banana Split Cake So Special?
Why is this dessert stealing the spotlight? The answer lies in its layers of flavor and texture. From the buttery graham cracker crust to the creamy filling, sweet bananas, and delightful toppings, every bite is a little piece of heaven. Plus, it’s incredibly versatile—you can tweak it to suit your taste buds or dietary preferences.
Let’s not forget that it’s a no-bake wonder! No need to heat up the oven or spend hours sweating in the kitchen. It’s as simple as mixing, layering, and chilling.
A Brief History of the Banana Split
Before diving into the cake, let’s give a nod to the classic dessert that inspired it. The banana split originated in the early 1900s, created by a clever pharmacist named David Strickler. He decided to transform a plain banana into a masterpiece by splitting it in half and loading it with ice cream, syrup, and whipped cream. The dessert was an instant hit, and it has remained a beloved treat ever since.
Fast-forward to today, and the banana split cake takes this classic concept to the next level. It swaps ice cream for a rich, creamy filling while keeping all the nostalgic flavors intact.
For a fun dessert-making guide, don’t miss How to Make a Cookie Cake: A Step-by-Step Guide, perfect for those who love baking at home.
Ingredients for the Perfect Banana Split Cake
You know what they say: a recipe is only as good as its ingredients. To make the perfect banana split cake, you’ll need a mix of everyday staples and a few fun extras. Here’s a rundown of everything you’ll need:
Key Components of the Cake Base
The foundation of your banana split cake is the crust, and trust me, it’s what holds this masterpiece together—literally! Here’s what you’ll need:
- Graham Cracker Crumbs: The crumbly, buttery base that forms the crust.
- Butter: Melted butter helps bind the crumbs and adds a rich flavor.
- Sugar: Just a touch to sweeten the crust.
Ideal Toppings to Enhance Flavor
Toppings are the stars of this dessert—they’re what make it feel like a true banana split. Here’s what you’ll want to grab:
- Fresh Bananas: They’re the hero of this cake, adding natural sweetness and a refreshing bite.
- Crushed Pineapple: For a tangy twist that balances the richness.
- Strawberries or Maraschino Cherries: To add a pop of color and fruity flavor.
- Chopped Nuts: For that all-important crunch.
- Chocolate Syrup: Because everything’s better with a drizzle of chocolate.
- Whipped Cream: Light, airy, and oh-so-dreamy.
Optional Add-ons for Customization
Want to make your cake stand out even more? Here are some fun ideas to try:
- Caramel Drizzle: For an extra layer of sweetness.
- Shredded Coconut: A tropical touch that pairs perfectly with pineapple.
- Chocolate Chips or Sprinkles: For a playful finish.
If you’re exploring crust alternatives, consider What Pan Is Best for Cookie Cake? The Ultimate Guide to learn how pan choices can impact your crust’s texture.
Block Quote:
“Desserts are all about creativity. Don’t be afraid to experiment with your favorite flavors and textures!”
Preparing Your Ingredients Like a Pro
Before you start layering, take a moment to prep everything. Slice the bananas, drain the pineapple, and have your toppings ready to go. Trust me, having everything organized will make the assembly process a breeze.
Pro Tip: Keeping Bananas Fresh
Here’s a little trick to keep your bananas from turning brown: toss the slices in a bit of lemon juice before layering them. It won’t affect the flavor, but it’ll keep them looking fresh and vibrant.
Ingredient Substitutions for Dietary Needs
Got dietary restrictions? No problem! Here’s how to make your banana split cake more inclusive:
- Gluten-Free: Use gluten-free graham crackers for the crust.
- Dairy-Free: Swap regular butter and whipped cream for plant-based alternatives.
- Sugar-Free: Opt for a sugar substitute to keep things sweet but healthy.
For a fun take on cookies and cakes, explore Cookie Cake Bliss: Tips, Tricks, and Toppings You’ll Love for additional dessert inspiration.
What’s Next?
Now that you’ve got a solid understanding of the ingredients and their roles, it’s time to dive into the fun part: assembling the cake! But let’s save that for the next section.
Step-by-Step Guide to Making Banana Split Cake
Now that we’ve covered the essentials, it’s time to roll up our sleeves and start creating this dessert masterpiece. Making a banana split cake is like building a house—you need a solid foundation, the right layers, and a beautiful finish. Let’s walk through the process, step by step, so you can create a cake that will wow your friends and family.
Preparing the Cake Base
The crust is where it all begins! This foundation is key to a banana split cake that holds its shape and delivers a satisfying crunch with every bite. Here’s how to get it just right:
- Gather Your Ingredients: You’ll need graham cracker crumbs, melted butter, and sugar.
- Mix the Crust: Combine the crumbs, butter, and sugar in a bowl until the texture resembles wet sand. Here’s a handy guide on how to make the perfect graham cracker crust if you need some extra tips.
- Press and Chill: Firmly press the mixture into a 9×13-inch pan, making sure to spread it evenly. Chill the crust in the fridge for at least 20 minutes to set.
Pro Tip: Adding a pinch of cinnamon to the crust mixture can give it a subtle warmth that pairs beautifully with the other layers.
Creating the Creamy Filling
The creamy filling is the heart of the banana split cake. It ties everything together with its light, luscious texture.
- Cream Cheese Mixture: Beat softened cream cheese and powdered sugar until smooth.
- Add Whipped Topping: Fold in the whipped topping to keep the mixture fluffy and light. If you need alternatives to traditional whipped cream, check out these whipped topping substitutes for ideas.
Pro Tip: Want a tangy twist? Add a splash of lemon juice to your cream cheese mixture for a slight zing that offsets the sweetness.
Assembling the Layers
This is where the dessert really starts to come together. Each layer adds its own burst of flavor and texture.
Top with Extras: If you love strawberries or cherries, now’s the time to add them as an additional layer.ing? Sprinkle a bit of shredded coconut or mini chocolate chips between the layers for a fun surprise.
Layer the Bananas: Arrange thin banana slices over the cream cheese filling, covering the surface completely.
Add the Pineapple: Spread drained crushed pineapple evenly over the bananas. Be sure to remove excess juice to avoid a soggy dessert. Learn more about preventing soggy desserts to ensure your layers stay intact.
Adding the Toppings
This is the final layer and arguably the most fun part of making a banana split cake. Think of it as decorating your dessert masterpiece.
- Whipped Cream Layer: Spread a generous amount of whipped cream over the top of the cake.
- Chocolate Syrup Drizzle: Drizzle chocolate syrup in zig-zag patterns across the whipped cream.
- Nuts and Extras: Sprinkle chopped nuts, shredded coconut, or even crushed cookies for added texture.
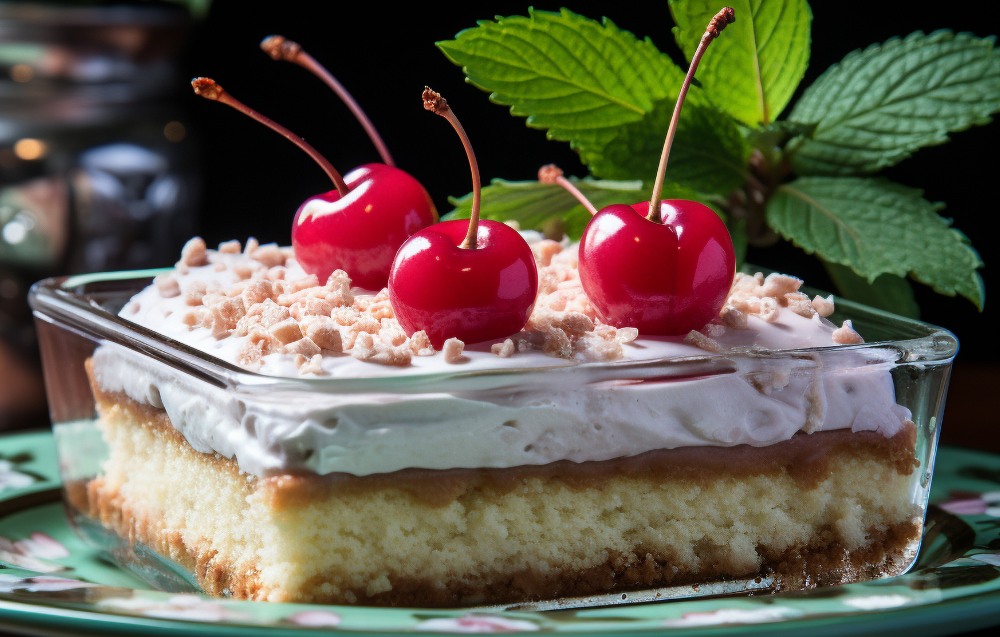
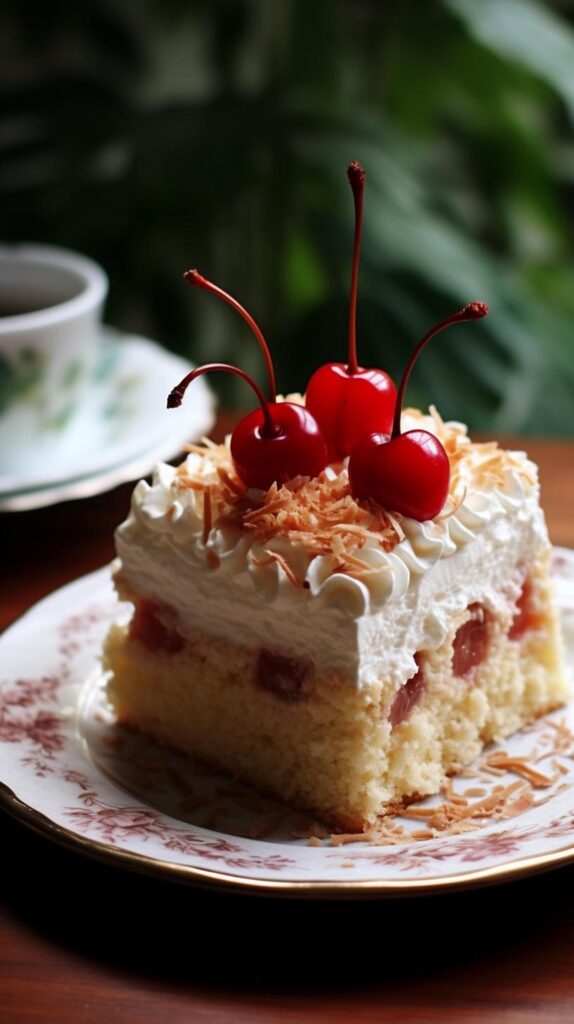
- Finishing Touches: Top with maraschino cherries for a pop of color and a nod to the classic banana split.
Troubleshooting Common Issues
Even the most seasoned bakers encounter hiccups. Here are some common issues and how to solve them:
Preventing a Soggy Base
If your crust is too wet, it can fall apart or soak up moisture from the filling. To prevent this:
- Always chill the crust before adding layers.
- Ensure your pineapple is thoroughly drained before adding it to the cake.
Achieving the Right Texture
The cream filling should be smooth and fluffy—not lumpy or runny. Here’s how to get it right:
- Make sure your cream cheese is softened to room temperature before mixing.
- Use a hand or stand mixer to achieve a smooth consistency.
Troubleshooting Topping Meltdowns
If your whipped cream layer starts to slide or melt, it might be due to heat or overhandling. To fix this:
- Chill your whipped cream before spreading it on the cake.
- Work quickly and refrigerate the cake immediately after decorating.
Block Quote:
“Remember, every great dessert has a story—and a few lessons learned along the way!”
Chilling and Serving the Cake
Patience is a virtue, especially when it comes to banana split cake. Once assembled, let it chill in the refrigerator for at least 4 hours, or overnight if possible. This allows the layers to set and the flavors to meld together beautifully.
When it’s time to serve, grab a sharp knife and slice the cake into squares. Use a spatula to gently lift each slice onto a plate.
Pro Tips for Serving
- Perfect Slices: Wipe your knife with a damp cloth between cuts for cleaner slices.
- Extra Garnish: Add a dollop of whipped cream and a cherry on each slice for a picture-perfect presentation.
Creative Variations of Banana Split Cake
The beauty of banana split cake lies in its adaptability. You can take the basic recipe and tweak it to suit your tastes, dietary needs, or simply to experiment with fun flavors. Here are some creative variations to try:
No-Bake Banana Split Cake Recipe
This version is perfect for those who want to skip the oven entirely (or when it’s just too hot to bake).
- Crust: Use crushed graham crackers, or try crushed vanilla wafers or digestive biscuits for a unique twist.
- Filling: Stick to the classic cream cheese and whipped topping mixture or add a splash of vanilla extract for extra flavor.
- Toppings: Focus on fresh fruit and whipped cream for a lighter finish. No chocolate syrup? Drizzle with honey or caramel instead.
Gluten-Free Banana Split Cake
Making this dessert gluten-free is surprisingly easy!
- Crust: Swap the graham crackers with gluten-free alternatives. Almond flour mixed with melted butter and a touch of sugar also works as a delicious crust.
- Filling and Toppings: Stick to the standard recipe since most of the ingredients (cream cheese, whipped topping, and fruit) are naturally gluten-free.
Vegan Banana Split Cake Options
For a plant-based version of this dessert, make a few simple swaps:
- Crust: Use vegan cookies or biscuits crushed and mixed with coconut oil instead of butter.
- Filling: Replace cream cheese with a vegan alternative, like cashew cream or coconut cream. Use plant-based whipped topping.
- Toppings: Ensure your chocolate syrup and any extras are vegan-friendly.
Low-Calorie Banana Split Cake
Want to enjoy this dessert guilt-free? Here’s how to make it lighter:
- Use low-fat cream cheese and sugar-free whipped topping.
- Replace sugar with a low-calorie sweetener like stevia.
- Skip the nuts and chocolate syrup, focusing on fresh fruit for natural sweetness.
Tips for Presenting and Serving Banana Split Cake
Presentation is half the battle when it comes to impressing your guests. Here are some tips to make your cake look as good as it tastes:
Choosing the Right Serving Dish
Your serving dish sets the stage for the entire dessert. Use a glass dish or a clear trifle bowl to show off the beautiful layers. If you’re serving individual portions, mason jars or dessert cups can be a fun, portable option.
Garnishing for Maximum Visual Appeal
- Add Fresh Fruit: Arrange thin slices of strawberries, bananas, or kiwis on top for a colorful finish.
- Drizzle Strategically: Use a squeeze bottle for chocolate or caramel syrup to create clean, decorative lines.
- Sprinkles: A dash of sprinkles can add a playful touch, perfect for kids or festive occasions.
Storing Leftovers Without Compromising Taste
Got leftovers? Lucky you! To store banana split cake:
- Refrigerator: Cover the dish tightly with plastic wrap or a lid. It’ll stay fresh for up to 3 days.
- Freezer: For longer storage, place individual slices in airtight containers and freeze. Thaw in the fridge before serving.
Note: Freezing may alter the texture slightly, especially with the fresh fruit.
Block Quote:
“Presentation isn’t just about impressing others—it’s about celebrating the dessert you’ve created with love!”
Nutritional Value of Banana Split Cake
Banana split cake is an indulgent treat, but it doesn’t have to feel like a guilty pleasure. Here’s how to strike a balance:
Balancing Indulgence with Healthy Choices
The bananas and pineapple in the cake provide natural sweetness and a boost of vitamins. Add more fresh fruit layers to up the nutritional value without sacrificing flavor.
Modifications for Lower-Calorie Alternatives
If you’re watching your calories, consider these swaps:
- Use reduced-fat or fat-free cream cheese.
- Opt for sugar-free syrups and whipped toppings.
- Reduce the amount of crust or switch to a nut-based crust for a lower-carb option.
Frequently Asked Questions About Banana Split Cake
Still have some burning questions? Here are the answers to the most common queries:
How Long Does Banana Split Cake Last?
When stored properly in the refrigerator, banana split cake can last up to 3 days. After that, the fresh fruit may start to lose its texture and freshness.
Can You Freeze Banana Split Cake?
Yes! You can freeze it for up to 2 months. However, keep in mind that the texture of the fresh bananas and whipped topping might change slightly after thawing.
What Fruits Can Be Substituted for Bananas?
If bananas aren’t your thing, try these alternatives:
- Peaches: For a summery vibe.
- Mangoes: To add a tropical flair.
- Apples or Pears: Thinly sliced and lightly sautéed for a unique twist.
Conclusion: A Dessert Worth Sharing
Banana split cake isn’t just a dessert; it’s a celebration of flavor, texture, and creativity. Whether you stick to the classic recipe or experiment with fun variations, it’s bound to become a crowd favorite. Plus, the no-bake nature makes it a stress-free option for any occasion.
So, grab your ingredients, unleash your inner chef, and create a dessert that’s as delightful to make as it is to eat. Trust me—one bite, and you’ll be hooked!